April 10, 2011

365/ 61 & 62 Starfish Pillow Birthday Gift

What a week! Work was crazy and for a time so was I (more than usual). BUT...I found time to be creative and that saved me. The last couple of days (Tues/Sat/Sun) I have been working on a special gift for my friend Ken. It was his birthday and I wanted to do something really nice. 

A few years ago he pointed out a starfish pillow that he really liked. That memory is the inspiration for the Starfish Pillow I made him.

The front of the pillow sports a partial wool felt starfish. Figuring out how big to make the starfish and where to center it was a challenge. This pillow is 20" square, so I had to tape sketch paper together to get a proper sized template. 

I divided the paper into thirds (horizontally and vertically) so that the design would be off center and still look good.
Do you like my fabric choice? It is from my generous friend Amy who didn't know what to do with it or even know why she had it. We agreed that it was a terrible minty green color. However, 10 minutes with my pal Jacquard Dye-Naflow and wha-la: a gorgeous beach inspired fabric perfect for the Starfish Pillow. I am telling you changing the fabric color could not be easier! I was shocked and delighted with the new colors.

No less challenging for me was the back of the pillow. I went with an envelope closure, but the math to create it always messes me up. Yes I know, I mess up the math. Math is perfect. Before childbirth: math wiz...after childbirth: dunce.

Ooooopsie not enough painted fabric for the back, so what do I do? Add in more from the stash that matches the starfish on the front. Lucky for me that was white. It turned out nicer with the two colors. A happy accident. I was also more daring with the fabric color on the back so it has "rusty" areas too.

Here is a close-up view of the starfish. I used different colors of DMC and other flosses to create the bumpy texture on the arms. I used  pinkish-grays, peach tones and a peach variegated floss. Recognize the knots? French of course. I got really quick at doing the French Knots. This was the most relaxing part to do.

This is how it would look on my bed if I had made one for me too. Actually, I just might do that.

For now I am entering my pillow in the Blogger's Pillow Party. Click the graphic below to visit their site for details.


Blogger's Pillow Party

April 8, 2011

365/61 How to Make Tropical Yogurt

Belated Post for Tuesday, April 8th

I have finally gotten back to cooking healthy and eating lots of fruits and veggies. What I have discovered is that I don't do well when I have lots of bread or flour based foods. Bready carbs make me sleepy, sluggish and give me lots of heart burn. Does this happen to you too? Some people can tolerate them well, but I need to keep my consumption of them low. 

I have also been trying to cut out white sugar so I no longer eat milk chocolate but have switched back to the darkest chocolate I can find since it tends to have a much lower sugar content. My favorite is the Extra Strong Dark 77% Chocolove Bar..mmmm. love bar. I lie. I am a chocoholic and will eat the milk, but have been feasting on  the dark stuff instead and the 77% is yummy and smooth.

So what does this have to do with yogurt? I used to eat my plain yogurt with a little granola, chocolate chips, and honey on top. I just created a recipe for making a much better and healthier version that I now crave!

Tropical Yogurt
  • Plain low-fat or non-fat yogurt (has no added sugar)
  • cut up cantaloupe or seedless grapes cut in half or hey...both
  • 1/2 to 1tsp of Coconut Nectar or raw honey
  • 1 Tbs finely grated organic coconut flakes (without sugar)
  • 1/2 oz or 4-5 big walnut halves broken up
  • 1/2 Tbs bittersweet chocolate chips (I use Ghiradelli 60% and cut them in half because they are ginormous)

Place yogurt into your favorite bowl and top with the Coconut Nectar. Give the yogurt a light stir --- just enough to swirl the nectar around, but do not completely mix the two. Next add in the fruit, coconut, chocolate chips and finally the walnuts. 

This has become my favorite breakfast and snack. I prefer crunch in my yogurt and this recipe provides that. If you are following the Weight Watchers Points Plus Program then this is about 5 points. Give it a try, I think you will really like it. Let me know what you think.

April 5, 2011

365/60 Easy Face Moisturizer

Belated posting for Monday, April 4, 2010

I have been reading about the benefits of organic coconut oil and coconut milk and how great it is for your health. Just Google it and you will see. Anyway, I finally broke down and spent $8 on a 8oz jar. It smells wonderful and is great to cook with.

However I found another fabulous use for it. My face! I have tried lots of different moisturizers with no positive or lasting effects. For the last few years my face has been so dry and flaky and nothing seemed to make an impact.

I have a simple recipe that I have been using for four days now. Normally I would have to scrape off the dry spots/flakes before moisturizing every morning--ick. After only four days of using coconut oil, my face looks the best it has in a long time with very little to no flaking. There is no greasy residue when applied lightly. I have used less than a teaspoon so far, so an 8oz jar would last an incredibly long time. This makes Coconut Oil the best moisturizer I have used and the least expensive! And...I can eat it. LOL.

Coconut Oil Moisturizer
Ingredients: Organic Coconut Oil

How to Use:

  • Transfer one TBS of Coconut Oil into a small container (like those used for salad dressings when ordering take-out...mmm take-out)
  • After showering rub finger over coconut oil to soften it and apply all over face. It only takes a very small amount!
OR:
  • Clean face with Witch Hazel to moisten and clean it, then apply small amount of Coconut Oil to face
For really dry or flaky skin like mine:
  • Apply facial scrub (Depending on your dryness you might do this 2-3 times a week)
  • Apply small amount of Coconut Oil to face.
  • As the dryness and flakiness clears up, there will be less need for the facial scrub.
  • On non-facial scrub days clean face with Witch Hazel to moisten and clean it, then apply small amount of Coconut Oil to face.
It is so simple and works so well. Let me know if you try this and if it worked for you.

356/58 & 59 Making Headway in Embroidery of Quilt

I have been doing data intensive consulting work, so after a day of that I really haven't been into spending more time on the computer. But today is blog catch up day.

Well, I am finally making some good progress with the embroidery of my Dead Parrot Pirate Quilt. Although I would like to be quicker at it, I find that I really am enjoying the process. Its very relaxing--when I'm not ripping out stitches. My hope is that by the time I have embroidered my way back up to the first "Yo" that I will be motivated by my new skills to redo that "Yo". It at least deserves an "o".

Here is a photo of my efforts from Saturday and Sunday night.


The Close Up

March 31, 2011

365/ 56 & 57 Of Pirates and Best Friends

Saturday I got a call from one of my most favorite friends whom I do not get to see enough. My dear friend Kathy Hart had a solution to my problem with embroidering text onto the backside of my Dead Parrot Pirate Art Quilt. Kathy is one of those amazing people who sees something, wants to make it herself and does it--and does it very well. Totally fearless and awesome gal!!

So she called me to tell me exactly what I needed to do in order to get the embroidery looking good. Just from looking at the picture on my blog, she could immediately tell that I was using too many threads. The DMC floss can be pulled apart so that you have six strands. My thinking was, hey this will go quicker if I use it as is, nice and thick. Wrong. Kathy knew that. 

Kathy also said that my stitches were going the wrong way and that I should outline stitch the letters and then fill them in with satin stitch--but those stitches needed to be horizontal and alternate the lengths within each row. I love it when my friends have the answers I need!

Here is the before:
Before: 

I also decided to embroider on top of Sulky Light Tear Away Stabilizer. First I traced the letters onto the stabilizer and then temporarily sewed the strips onto my quilt with a running stitch.  Here is my sampler I did after I talked with Kathy:
  After:


Much better. From the sampler I also learned that it was better to do the outline stitch then remove the stabilizer prior to filling in the letters and skull with satin stitches. The sampler looks fuzzy because I didn't remove the stabilizer until after I was done with the embroidery. It's very difficult to all remove that stuff from under the stitches. 

Close up of the skull prior to embroidery on the stabilizer and after I removed it:


Feeling like maybe I knew what I was doing, I moved onto the quilt back and got all of the stablizer sewn on. It's much different trying to do embroidery on a quilt. I learned that my stitches were much too loose and have redone the "Y" in Yo three times now. And the "o" is missing. I have decided to continue with the rest of the quilt and will finish up that first "Yo" last. 

Here is my progress as of last night:


March 28, 2011

365/55 Upcycle Wrapping Paper Insert Tutorial

This one I made for the tut
Yesterday my daughter and I were busy wrapping gifts for my Mom, niece and brother. My brother really wanted lots of socks, so that is what I got him. What is really cool about his gift is the impromptu way that we wrapped it. I liked the idea so much that I thought I would make a tutorial to share. And he liked the gift wrap so much that he kept it.


Below is the, but if you want to download it for later here the is pdf:


Making wrapping paper out of the thin wrapping paper insert (WPI) that is in the middle of rolled wrapping paper is easy, a fun family activity, saves money and is a great way to upcycle materials in your home. WPI is great for odd shaped gifts, bulky items or those with sharp edges that might rip regular wrapping paper.


Supplies
WPI tube
  • wrapping paper inserts (WPI) from the middle of wrapping paper rolls (these rolls are made of thin card board rolled up, not the traditional card board tubes)
  • sharpie, crayons, markers, paint, stickers or whatever medium you feel comfortable with or have in your home--no need to buy anything. In fact don’t buy anything. The challenge of using what you have on hand is part of the fun.
  • stapler
  • regular or colored staples
  • scissors
  • your imagination or a child who likes to draw

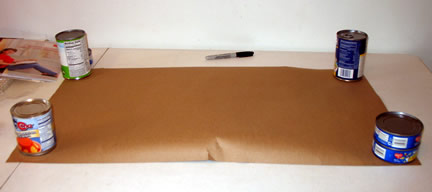
    Step 1:  Remove the WPI from the wrapping paper roll and unroll it. You want the WPI to curl up over your gift, so decorate the opposite side. If the WPI is curling up, then turn it over so that it can be flattened slightly.  I am holding mine in place with cans.
Step 2: Most of the paper rolls are brown, so in order to use light colors paint the roll first with white acrylic paint or gesso. Allow WPI to dry. Or love it for what is and proceed to Step 3.

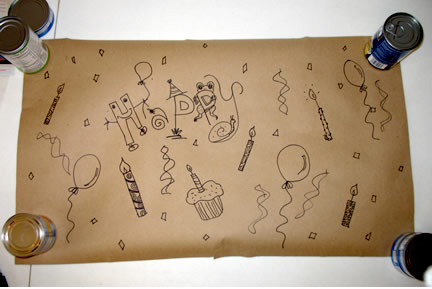
Step 3: Decorate your WPI. Use a black sharpie or dark marker to create multiple images with a common theme like balloons, birthday cake, candles, words, happy faces, doodles, laughing chickens or perhaps a hint as to what is inside. Get fun and funky with your WPI! Children have a great time with this part and the bonus gift is their artwork. I have an Uncle who kept a large paper bag that I decorated for his gift  many many many years ago.
Step 4: The black sharpie looks great all by itself or you could opt to color in your images or words with crayons or paint.

Time to wrap your gift with your new wrapping paper.
  • Place your fun and funky WPI  on a flat surface with the design facing away from you.
  • If necessary, cut the WPI to size if it is too large.
  • Put your gift in the center of the WPI.
  • Fold over 2 edges of the WPI so that they overlap each other and it cover the gift.
  • Staple the WPI where the edges overlap. Just go as far up as the stapler lets you. It does not take many staples to get the job done.
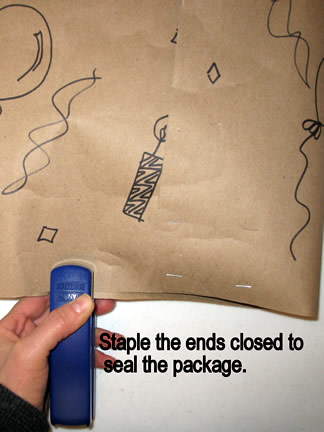
  • Now staple across the bottom edges to close up the ends being careful not to put a staple in the gift.


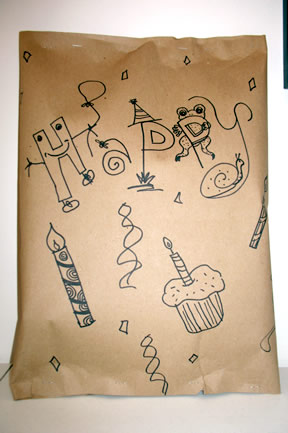
Your gift is now secure inside and looks great! Because this stuff is sturdy, you can save it to use for the next gift--if they let you have it back.

Notes: I would not use this type of wrapping for a very young child due to the staples.

What to make your gift snarky? Use duct tape instead of staples to wrap it up--all over. Kids will giggle and roll on the floor at the silliness and won’t even care about what is inside. Now you have given them a fun memory as well as gift. 

Let me know how you liked the tutorial. To share the tutorial please use this link:http://creatibus.blogspot.com/2011/03/36555-upcycle-wrapping-paper-insert.html

March 26, 2011

365: 53 & 54 All Wired Up

"I do believe there come a time when everything just falls in line, We live and learn from our mistakes...."

Great song eh? I really do have shameless fun creating my blog titles. But ya know, that song fits the craftivity I started last night perfectly. Last night my efforts sucked and looked hopeless, this morning -- you shall see. It all started with my Mom...of course it did. I promise this is not a therapy posting. lol.

It was Mom's birthday at the beginning of the month and my brother's and my niece too. Jeez. So what to do? Well if you have been reading my blog (thank you again for your lovely comments and encouragement!) you already know that I made my niece a really pretty wire frame and bead necklace

Mom said she wanted me to make a Pandora style bracelet and green. Thanks Mom. Although I make lots of different kinds of jewelry from some strange stuff like milk jug plugs, I am not glass bead maker. Ya okay that one class I took doesn't count and those beads would drag King Kong's neck to jungle floor. Being a Suze Orman follower, I decided to make do with what I had. I am an artist and up for the challenge.

A week later I had the answer. I really liked my niece's bday necklace so why not make something similar, but as a bracelet for dear Mom. Ya that's the ticket. I dragged the needed tools, beads, and wire to the couch... a terrible workbench to be sure. I made everything: wire frames, jump rings and clasp, but not the beads.

Don't show Mom this until after Sunday, that's when everyone gets their belated present. Here is her bracelet:
End link and clasp
 
Center Frame


The artsy view.